Connecting to non-public PostgreSQL schema with CodeIgniter 4
If you are building application with CodeIgniter 4 using PostgreSQL database, you will have to use ‘public’ default schema. How about if you want to use a different schema for specific needs? For example, you have the the product table that placed in “inventory” schema like the following:

To be able to make operation against “inventory” schema, we need to update schema property of Database Connection class. If we use Model class, eg: ProductModel class, we can override __construct() method and update the schema value, like the following:
<?php

namespace App\Models;

use CodeIgniter\Database\ConnectionInterface;
use CodeIgniter\Model;
use CodeIgniter\Validation\ValidationInterface;

class ProductModel extends Model
{
    protected $table      = 'product';
    protected $returnType = 'array';

    public function __construct(ConnectionInterface &$db = null, ValidationInterface $validation = null)
    {
        parent::__construct($db, $validation);

        $this->db->schema = 'inventory';
    }
}
So, whenever we call:
use App\Models\ProductModel;

// ...
$model = model(ProductModel::class);
$model->findAll();
We will find all product table records in ‘inventory’ schema on first priority, if table not found in the ‘inventory’ schema, it will fallback to ‘public’.
That’s it.
Create RESTful API in CodeIgniter 4
In CodeIgniter 4, there is already CodeIgniter\RESTful\ResourceController that make building RESTful API easier. It can consume the model by provide modelName property.
Preparation
1. Register Routes
// app/Config/Routes.php
$routes->resource('products');
2. Create Model and Entity Classes
For example, we have the ProductModel class:
<?php namespace App\Models;

use App\Entities\Product;
use CodeIgniter\Model;

class ProductModel extends Model
{
    protected $table           = 'product';

    /**
     *  $returnType as entity class  in RESTful API might not work in CodeIgniter 4.0.2.
     *  You can define as "object" at CodeIgniter 4.0.2 for RESTful API usage.
     *
     *       protected $returnType      = 'object';
     *
     */
    protected $returnType      = Product::class;

    protected $allowedFields   = [
        'product_code',
        'product_name',
    ];
    protected $validationRules = [
        'product_code' => 'required|alpha_numeric|exact_length[5]|is_unique[product.product_code,id,{id}]',
        'product_name' => 'required|alpha_numeric_space|min_length[3]|max_length[255]|is_unique[product.product_name,id,{id}]',
    ];
}
Above model require entity class, so, we can create as follow:
<?php namespace App\Entities;

use CodeIgniter\Entity;

class Product extends Entity
{
    protected $attributes = [
        'product_code' => null,
        'product_name' => null,
    ];

        // filter on create/update data if necessary
    public function setProductCode(string $productCode): self
    {
        $this->attributes['product_code'] = strtoupper($productCode);
        return $this;
    }

        // filter on create/update data if necessary
    public function setProductName(string $productName): self
    {
        $this->attributes['product_name'] = ucwords($productName);
        return $this;
    }
}
3. Ensure the pages has “csrf” filter DISABLED for the RESTful API pages
CSRF usually uses only for public web interation forms. For API, we can use authorization token (eg: for Oauth usage). We can disable csrf filter in app/Config/Filters.php like the following:
<?php namespace Config;

use App\Filters\PostRequestOnly;
use CodeIgniter\Config\BaseConfig;

class Filters extends BaseConfig
{
    // ...

    public $globals = [
        'before' => [
            'csrf' => [
                'except' =>  [
                    '/products',
                    '/products/*',
                ],
            ],
        ],
    ];

    // ...
}
The API
We can create a controller for it, that extends CodeIgniter\RESTful\ResourceController:
<?php namespace App\Controllers;

use CodeIgniter\RESTful\ResourceController;

class Products extends ResourceController
{
    protected $modelName = 'App\Models\ProductModel';
    protected $format    = 'json';
}
For display all products, we can create method index:
// ...
    public function index()
    {
        return $this->respond($this->model->findAll());
    }
// ...
This is the output of all products:

For display product by id, we can add method show:
// ...
    public function show($id = null)
    {
        $record = $this->model->find($id);
        if (! $record)
        {
            return $this->failNotFound(sprintf(
                'product with id %d not found',
                $id
            ));
        }

        return $this->respond($record);
    }
// ...
This is the output when product found and not found:

For create new product data, we can add method create:
// ...
    public function create()
    {
        $data = $this->request->getPost();
        if (! $this->model->save($data))
        {
            return $this->fail($this->model->errors());
        }

        return $this->respondCreated($data, 'product created');
    }
// ...
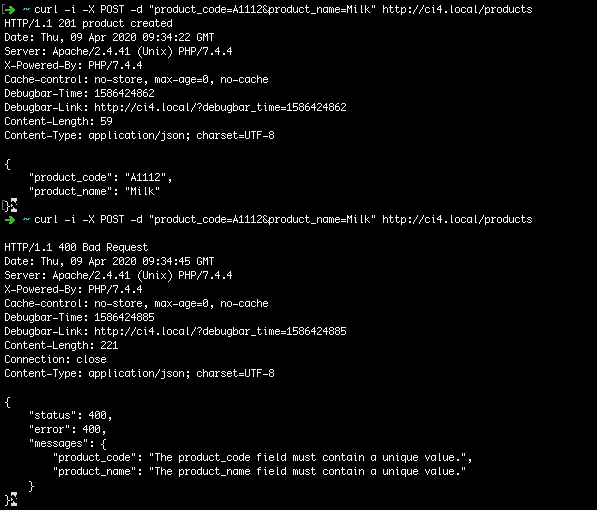
Above, we use getPost() from request object to get POST data. This is the output when product creation is succeed and failed:
For update product data, we can add method update:
// ...
    public function update($id = null)
    {
        $data       = $this->request->getRawInput();
        $data['id'] = $id;

        if (! $this->model->save($data))
        {
            return $this->fail($this->model->errors());
        }

        return $this->respond($data, 200, 'product updated');
    }
// ...
Above, we use getRawInput() from request object to get PUT data. Currently, there is no “respondUpdated” method, I created Pull Request for it at https://github.com/codeigniter4/CodeIgniter4/pull/2816 for addition of “respondUpdated” method.
This is the output when product update is succeed and failed:

Now, the last one, the delete, we can add delete method:
// ...
    public function delete($id = null)
    {
        $delete = $this->model->delete($id);
        if ($this->model->db->affectedRows() === 0)
        {
            return $this->failNotFound(sprintf(
                'product with id %d not found or already deleted',
                $id
            ));
        }

        return $this->respondDeleted(['id' => $id], 'product deleted');
    }
//...
This is the output when product delete is succeed and failed:

That’s it 😉
Using Model::paginate() for SQL Join in CodeIgniter 4
From Model, in CodeIgniter 4, we can paginate existing query that we use in current table defined in $table property, eg in model, like the following:
<?php namespace App\Models;

use CodeIgniter\Model;

class ProductModel extends Model
{
    /**
     * define properties table, returnType, allowedFields, validationRules, etc here
     */

    // ...
	public function getPaginatedProductData(string $keyword = ''): array
	{
		if ($keyword)
		{
			$this->builder()
				 ->groupStart()
					 ->like('product_code', $keyword)
					 ->orLike('product_name', $keyword)
				 ->groupEnd();
		}

		return [
			'products'  => $this->paginate(),
			'pager'     => $this->pager,
		];
	}
    // ...

}
That’s for paginate rows in same table, how about in SQL Join? We can! For example, we have a use case to get product and price from the following table relation

that can be grabbed with join:
SELECT
     `product`.`*`,
     `price`.`price`
         FROM
             `product`
         JOIN
             `price`
         ON
             `product`.`id` = `price`.`product_id`
         WHERE
            `price`.`date` = DATE_FORMAT(NOW(),'%Y-%m-%d');
If we want an object representation with entity class, we can create an entity for that:
<?php namespace App\Entities;

use CodeIgniter\Entity;

class ProductWithPrice extends Entity
{
    protected $attributes = [
        'id'           => null,
        'product_code' => null,
        'product_name' => null,
        'price'        => null,
    ];
}
Now, in the model, we can query the join and then paginate:
<?php namespace App\Models;

use App\Entities\ProductWithPrice;
use CodeIgniter\Model;

class ProductModel extends Model
{
    // ...
	public function getPaginatedProductWithPriceData()
	{
		$this->builder()
			 ->select(["{$this->table}.*", 'price.price'])
			 ->join('price', "{$this->table}.id = price.product_id")
			 ->where("price.date = DATE_FORMAT(NOW(),'%Y-%m-%d')");

		return [
			'productWithPrices'  => $this->asObject(ProductWithPrice::class)
                                         ->paginate(),
			'pager'              => $this->pager,
		];
	}
    // ...
}
That’s it, the paginate() function now will paginate the query join we have with the object entity for the result row.
Create API Service in CodeIgniter 4 with Request Filtering
In CodeIgniter 4, there is a trait that specialized to be used for API, named CodeIgniter\API\ResponseTrait for that, that consist of collection of functionality to build a response. How about request filtering ? We will need a filter class that implements CodeIgniter\Filters\FilterInterface interface.
For example, we are going to create a /api/ping api service, which will returns time value, we can create controller as follow:
<?php
// application/Controllers/Api/Ping.php
declare(strict_types=1);

namespace App\Controllers\Api;

use function time;

use CodeIgniter\API\ResponseTrait;
use CodeIgniter\Controller;
use CodeIgniter\HTTP\ResponseInterface;

final class Ping extends Controller
{
    use ResponseTrait;

	public function index(): ResponseInterface
	{
        return $this->respond(['ack' => time()]);
    }
}
Without filtering, we can call url and got result like the following based on Accept header, for example, for application/xml, it will get:
➜  ~ curl -i -H "Accept: application/xml" http://localhost:8080/api/ping
HTTP/1.1 200 OK
Host: localhost:8080
Date: Sat, 22 Sep 2018 01:11:30 -0500
Connection: close
X-Powered-By: PHP/7.2.9
Cache-control: no-store, max-age=0, no-cache
Content-Type: application/xml; charset=UTF-8
Debugbar-Time: 1537596690
Debugbar-Link: http://localhost:8080/index.php/?debugbar_time=1537596690

<?xml version="1.0"?>
<response><ack>1537596690</ack></response>
and when it changed to application/json, it will get:
➜  ~ curl -i -H "Accept: application/json" http://localhost:8080/api/ping
HTTP/1.1 200 OK
Host: localhost:8080
Date: Sat, 22 Sep 2018 01:11:53 -0500
Connection: close
X-Powered-By: PHP/7.2.9
Cache-control: no-store, max-age=0, no-cache
Content-Type: application/json; charset=UTF-8
Debugbar-Time: 1537596713
Debugbar-Link: http://localhost:8080/index.php/?debugbar_time=1537596713

{
    "ack": 1537596713
}
Let’s try create filter it to only allow the “POST” request! We can create filter as follow:
<?php
// application/Filters/PostRequestOnly.php
declare(strict_types=1);

namespace App\Filters;

use CodeIgniter\Filters\FilterInterface;
use CodeIgniter\HTTP\RequestInterface;
use CodeIgniter\HTTP\ResponseInterface;
use Config\Services;

final class PostRequestOnly implements FilterInterface
{
	public function before(RequestInterface $request)
	{
        if ($request->getMethod() === 'post') {
            return;
        }

        return Services::response()
            ->setStatusCode(ResponseInterface::HTTP_METHOD_NOT_ALLOWED);
    }

	public function after(RequestInterface $request, ResponseInterface $response)
	{
	}
}
In above PostRequestOnly filter, we are allowing request only for “POST”, other request methods will get response with “Method Not Allowed” (405). To make it work, we need register it into Config\Filters::$aliases class under application directory, and ensure it applied into Config\Filters::$filters to register specific uri for the filter, as follow:
<?php
// application/Config/Filters.php

// ...
use App\Filters\PostRequestOnly;

class Filters extends BaseConfig
{
	public $aliases = [
        // ...
        'postRequestOnly' => PostRequestOnly::class,
    ];

    // ...

	public $filters = [
        // ...
        'postRequestOnly' => [
            'before' => [
                'api/ping',
            ],
        ],
    ];
}
That’s it! Now, when we try to see different result with GET and POST, it will get the following response:
GET: Method Not Allowed 405
➜  ~ curl -i -H "Accept: application/json" -X GET http://localhost:8080/api/ping
HTTP/1.1 405 Method Not Allowed
Host: localhost:8080
Date: Sat, 22 Sep 2018 13:12:22 +0700
Connection: close
X-Powered-By: PHP/7.2.9
Cache-control: no-store, max-age=0, no-cache
Content-Type: text/html; charset=UTF-8
POST: Got Response OK 200
➜  ~ curl -i -H "Accept: application/json" -X POST http://localhost:8080/api/ping
HTTP/1.1 200 OK
Host: localhost:8080
Date: Sat, 22 Sep 2018 01:12:54 -0500
Connection: close
X-Powered-By: PHP/7.2.9
Cache-control: no-store, max-age=0, no-cache
Content-Type: application/json; charset=UTF-8
Debugbar-Time: 1537596774
Debugbar-Link: http://localhost:8080/index.php/?debugbar_time=1537596774

{
    "ack": 1537596774
}
Upload File with Validation in CodeIgniter 4
In CodeIgniter 4, there is CodeIgniter\Validation\FileRules that can be used out of the box from validate() from controllers that we can using it on upload process.
For example, we have an upload form page with flow as follow:
- Display form at /form page with “avatar” file field
- Process form at /form/process with validations:
- is uploaded
- is mime in image/jpg,image/jpeg,image/gif,image/png
- the max size is less or equal than 4MB
- On valid upload, we move uploaded file to writable/uploads directory.
Before we start, please ensure that you’re using latest CodeIgniter4 develop branch by clone it:
$ git clone https://github.com/bcit-ci/CodeIgniter4.git
If you already have it, ensure to pull latest develop branch via command:
$ cd CodeIgniter4
$ git checkout develop
$ git remote add upstream https://github.com/bcit-ci/CodeIgniter4.git
$ git pull upstream develop
Most of the time, the updated code in the CodeIgniter4 repository will be core framework (system) and its tests, so, if we need to be always up to date framework, we can create new branch based on develop branch, for example:
$ git checkout -b tutorial-upload
Then, we can regularly rebase against develop :
$ git checkout develop && git pull upstream develop
$ git checkout tutorial-upload && git rebase develop
Enough with introduction, let’s start with code!
1. Display Form
<?php
// application/Views/form.php
$validationErrors = $this->config->plugins['validation_errors'];

helper('form');
echo form_open(
    'form/process',
    [
        'enctype' => 'multipart/form-data'
    ]
);

echo form_input('avatar', '', '', 'file');
echo $validationErrors(['field' => 'avatar']);

echo form_submit('Send', 'Send');
echo form_close();
Above, we display form with form helpers, and display validation errors by get it in validation_errors key in plugins.
To make it a form page, we can create a Form controller as follow:
<?php
// application/Controllers/Form.php
namespace App\Controllers;

use CodeIgniter\Controller;

class Form extends Controller
{
    public function index()
    {
        return view('form');
    }
}
To see the page, let’s fire a command:
$ php spark serve
The form page is now displayed at http://localhost:8080/form or http://localhost:8080/form/index like below:

2. Upload validation
We are going to use “form/process” page for file upload validation, so, we can create an process() function at the Form controller:
class Form extends Controller
{
    // ...
    public function process()
    {
        // verify if request method is POST
        if ($this->request->getMethod() !== 'post') {
            return redirect('index');
        }

        // validation
        $validated = $this->validate([
            'avatar' => [
                'uploaded[avatar]',
                'mime_in[avatar,image/jpg,image/jpeg,image/gif,image/png]',
                'max_size[avatar,4096]',
            ],
        ]);

        if ($validated) {
            // Business!
        }

        return redirect('index')->withInput();
    }
}
On above process() function, the validate() call supply the rules of avatar field needed, which are uploaded, mime_in, and max_size which we can found as functions at CodeIgniter\Validation\FileRules. When it is valid, it will returns true. We redirect back to /form/index with bring validation errors that saved in session flash with key _ci_validation_errors to be allowed to be displayed once in the next request like below:

3. Move uploaded file to writable/uploads directory
We have a WRITEPATH constant that refers to writable directory, and we can use its “$request->getFile(‘avatar’)->move()” to it, so when we have validated, we can do:
if ($validated) {
    $avatar = $this->request->getFile('avatar');
    $avatar->move(WRITEPATH . 'uploads');
}
That’s it! The complete Form controller class can be as follow:
<?php
// application/Controllers/Form.php
namespace App\Controllers;

use CodeIgniter\Controller;

class Form extends Controller
{
    public function index()
    {
        return view('form');
    }

    public function process()
    {
        if ($this->request->getMethod() !== 'post') {
            return redirect('index');
        }

        $validated = $this->validate([
            'avatar' => [
                'uploaded[avatar]',
                'mime_in[avatar,image/jpg,image/jpeg,image/gif,image/png]',
                'max_size[avatar,4096]',
            ],
        ]);

        if ($validated) {
            $avatar = $this->request->getFile('avatar');
            $avatar->move(WRITEPATH . 'uploads');
        }

        return redirect('index')->withInput();
    }
}
Testing CodeIgniter 4 application with kahlan ^3.0
This is another post series about CodeIgniter and Kahlan, but now, it will uses CodeIgniter 4. CodeIgniter 4 requires some constants and required classes and functions to be included during application bootstrap to make front controller works.
For example, we need to do functional test App\Controllers\Home controller, this is the kahlan-config.php we need to have:
<?php

use CodeIgniter\CodeIgniter;
use CodeIgniter\Services;
use Config\App;
use Config\Autoload;
use Kahlan\Filter\Filter;

Filter::register('ci.start', function($chain) {
    $root = $this->suite();
    $root->beforeAll(function ($var) {

        define('ENVIRONMENT', 'testing');
        define('BASEPATH',    'system'      . DIRECTORY_SEPARATOR);
        define('APPPATH',     'application' . DIRECTORY_SEPARATOR);
        define('ROOTPATH',    'public'      . DIRECTORY_SEPARATOR);
        define('WRITEPATH',   'writable'    . DIRECTORY_SEPARATOR);
        define('CI_DEBUG',    1);

        require BASEPATH . 'Autoloader/Autoloader.php';
        require APPPATH  . 'Config/Constants.php';
        require APPPATH  . 'Config/Autoload.php';
        require APPPATH  . 'Config/Services.php';

        class_alias('Config\Services', 'CodeIgniter\Services');

        $loader = Services::autoloader();
        $loader->initialize(new Autoload());
        $loader->register();

        require BASEPATH . 'Common.php';
        $app = new App();
        Services::exceptions($app, true)->initialize();

        $var->codeIgniter = new CodeIgniter(
            $app
        );

    });
    return $chain->next();
});
Filter::apply($this, 'run', 'ci.start');
We now can call $this->codeIgniter property in all entire tests.
We can then place the spec under spec/ directory:
.
├── DCO.txt
├── README.md
├── application
│   ├── Controllers
│   │   └── Home.php
├── spec
│   └── Controllers
│       └── HomeDispatchSpec.php
We can apply $_SESSION['argv'] and $_SESSION['argc'] to assign URI routing data:
$_SERVER['argv'] = [
    __FILE__,
    '/', // path
];
$_SERVER['argc'] = 2;

ob_start();
$this->codeIgniter->run();
$actual = ob_get_clean();

expect($actual)->toContain('Welcome to CodeIgniter');
Here is the complete tests:
<?php

namespace AppSpec\Controllers;

describe('Home Dispatch', function () {

    describe('/', function () {

        it('contains "welcome" greeting', function () {

            $_SERVER['argv'] = [
                __FILE__,
                '/', // path
            ];
            $_SERVER['argc'] = 2;

            ob_start();
            $this->codeIgniter->run();
            $actual = ob_get_clean();

            expect($actual)->toContain('Welcome to CodeIgniter');

        });

    });

});
Time to run test:
$ vendor/bin/kahlan --coverage=4 --src=application/Controllers/Home.php
            _     _
  /\ /\__ _| |__ | | __ _ _ __
 / //_/ _` | '_ \| |/ _` | '_ \
/ __ \ (_| | | | | | (_| | | | |
\/  \/\__,_|_| |_|_|\__,_|_| | |

The PHP Test Framework for Freedom, Truth and Justice.

Working Directory: /Users/samsonasik/www/CodeIgniter4

.                                                                   1 / 1 (100%)


Expectations   : 1 Executed
Specifications : 0 Pending, 0 Excluded, 0 Skipped

Passed 1 of 1 PASS in 0.120 seconds (using 4Mo)

Coverage Summary
----------------
                               Lines           %

 \                             1 / 1     100.00%
└── App\                       1 / 1     100.00%
   └── Controllers\            1 / 1     100.00%
      └── Home                 1 / 1     100.00%
         └── Home::index()     1 / 1     100.00%

Total: 100.00% (1/1)

Coverage collected in 0.003 seconds (using an additionnal 16Ko)
Done 😉
Using Layout in CodeIgniter 4
CodeIgniter 4 is not ready for production use, but we can already play with it. We can apply layout support to avoid repetitive header/footer/sidebar html code in our application’s views by provide helper and autoload it in the hook.
Ok, let’s start, first, we can clone a CI4 project by run command:
git clone https://github.com/bcit-ci/CodeIgniter4.git
We can use PHP-Development server launcher by go to CodeIgniter4 directory and run command:
php serve.php
and we will get the page:

The view of “Home::index()” of controller is placed at application/Views/welcome_message.php:
application/
├── Config
├── Controllers
│   └── Home.php
├── Views
│   ├── errors
│   ├── form.php
│   └── welcome_message.php
with code called in the controller like the following:
<?php namespace App\Controllers;

use CodeIgniter\Controller;

class Home extends Controller
{
    public function index()
    {
        return view('welcome_message');
    }
}
For example, we need to move the header and footer to the separate file, named application/Views/layout.php:
application/
├── Config
├── Controllers
│   └── Home.php
├── Views
│   ├── errors
│   ├── form.php
│   ├── layout.php
│   └── welcome_message.php
So, Let’s prepare the layout:
<html>
   <head></head> <!-- move code from welcome_message.php's html <head> to here -->
   <body>
        <!-- move code from welcome_message.php's style to here,
             or use separate file for css and apply to <head>
        -->

        <div class="wrap">
            <?php echo $content; ?>
        </div>
   </body>
</html>
Now, we can write a helper to wrap it, for example, named render helper. We can create a file named application/Helpers/render_helper.php:
application/
├── Config
├── Controllers
├── Helpers
│   └── render_helper.php
├── Views
Our render helper can have function() for render view with layout functionality, which we get the content of view, and then apply to the layout:
<?php

if ( ! function_exists('render'))
{
    function render(string $name, array $data = [], array $options = [])
    {
        return view(
            'layout',
            [
                'content' => view($name, $data, $options),
            ],
            $options
        );
    }
}
If most of the controllers will use the render helper, we can then autoload it in the Events:
application/
├── Config
│   ├── Events.php
├── Controllers
├── Helpers
├── Views
with post_controller_constructor event point:
<?php namespace Config;

use CodeIgniter\Events\Events;

Events::on('post_controller_constructor', function() {
    helper('render');
});
And now, we are ready to use the render() function in the controller:
<?php namespace App\Controllers;

use CodeIgniter\Controller;

class Home extends Controller
{
    public function index()
    {
        return render('welcome_message');
    }
}
Done 😉

leave a comment