My Approach to Working with 8GB RAM as a PHP Developer
I have been a macOS user for more than a decade. Despite this extensive period of use, there are still many tweaking tricks that I am not familiar with. This post aims to share how I optimize my experience with the knowledge I have, all while maintaining usability. If you notice anything that I’ve done incorrectly, feel free to correct me :).
Here are what I do:
1. Delete unused files periodically.
I contribute to open-source projects. A lot. Most of the files are on Github. When I no longer actively work on a specific repository, I just remove it locally and clean up from the trash. When I need it, I re-clone it. This allows me to have only about 20% of my storage filled:

From what I understand, this will enable macOS to write to the SSD more randomly, making everything snappy.
2. Create directories under ~/Downloads for different file types
This will allow me to easily identify files that I believe are still okay to be there and quickly look them up when needed.
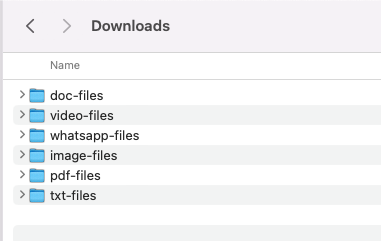
Periodically, I can review the downloaded files to identify those that are no longer needed and remove them.
3. Open fewer applications simultaneously
With 8GB of memory, it is indeed pretty limited in terms of what I can do simultaneously. Fortunately, I am not a multitasker, and I often only hit swap when running a specific long-running process (usually on CLI) while I work on other things as well, which is fine if actually needed.
What I open when I code?
- A Code Editor (Visual Studio Code: a less memory-intensive one but capable enough for some features I want, e.g., tab completion). I open a more memory-hungry one, PhpStorm, only when I need to debug unknown code or type-hinting code that is prefixed.
- Browser: Firefox
- Terminal
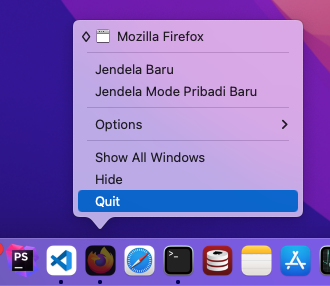
Yes, only the above. I don’t open Whatsapp or Twitter (X) as dedicated applications; I just open them in the browser when I need them, and close. No more free unused tabs.
When I no longer use specific applications, I ensure to quit them:
4. I disable notifications
I disable most of notification that I know not needed, and I can just open periodically when I want.

5. Prevent Spotlight from searching “www”
I named a directory “www” for project files, which consists of PHP projects with vendor included, which is a lot and changes very often. That allows me to have a low re-index process.

6. Disable iCloud service
I mostly use it when I want to pull something from iCloud, and it is very rare; I pull, then sign out.
7. Disable Siri
I don’t use Siri, so I disable it.
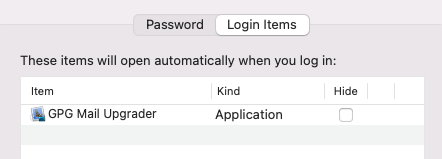
8. Clean up Login Items
I ensure that login items is limited.
9. Disable Database service
I rarely use a database service, so I just disable it as well.
10. Use PHP’s built-in web server
I don’t use dedicated web server, as PHP’s built-in web server is enough for me:
php -S localhost:8080 -t public
11. Using docker only when project require it
I only install Docker when I need it; other than that, I just remove it, clearing up all the containers!
That’s it 😉
Handle Slow PHP cli with IMAP extension on macOS
About two weeks ago, I installed a PHP project that required the IMAP extension. I installed it via MacPorts, and everything seemed okay. However, after that, I experienced very slow execution when running PHP via the CLI.
I am using macOS Monterey, which was released in 2021. It turns out that the issue has existed since 2016 on macOS Sierra. This was discussed on Stack Overflow in 2017:
The issue has already been reported to php-src:
I couldn’t reproduce the issue on Linux Ubuntu 22.04.
Following the Stack Overflow answer mentioned above, I tried to add my hostname to the /etc/hosts file. First, I obtained the hostname:
➜  ~ hostname

Abduls-Mac-mini.local
My original /etc/hosts file had the following entries:
127.0.0.1   localhost
::1         localhost
Then, I added the hostname to the third column on each row:
127.0.0.1   localhost Abduls-Mac-mini.local
::1         localhost Abduls-Mac-mini.local
After that, the issue was resolved, and it became fast again. That’s it! 😉
References:
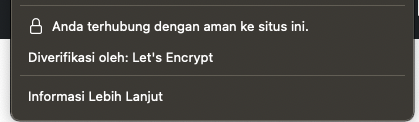
Use single SSL Certificate for www and non-www with Let’s Encrypt
If you have your own server or vps which you need to setup the SSL for you domain yourself, you can use single key for both www and non-www, just with single command. There is Certbot tool for that!
Some preparation to have:
- both www and non-www already accessible, eg:
www.yourdomain.comandyourdomain.com - have access to the server from SSH and sudo access
This post is assume you’re using Apache for PHP application with Ubuntu Operarating system.
Here the steps you can do:
1 Install the CertBot with instruction at https://certbot.eff.org/instructions?ws=apache&os=ubuntufocal
You can follow the instruction for other web server and operating system by choose which web server and operating system you use.
2 Run the CertBot command to generate SSL key for both www and non-www:
echo "2" | /usr/bin/certbot certonly --apache \
       --domains yourdomain.com,www.yourdomain.com \
       && /usr/bin/systemctl reload apache2 && /usr/bin/systemctl restart apache2
The option “2” above is used to Renew and Replace instead of keep existing certificate, then provide multiple domains after --domains to provide multiple domains separated by ,:
The SSL certificate will be generated at the following locations:
- /etc/letsencrypt/live/yourdomain.com/fullchain.pem
- /etc/letsencrypt/live/yourdomain.com/privkey.pem
or based on your output information.
3 If your site use default domain, you may need to lookup the following paths:
- /etc/apache2/sites-available/000-default.conf
- /etc/apache2/sites-available/default-ssl.conf
If you have different domain then root domain, create new one for them, eg: yourdomain.com.conf and yourdomain.com-ssl.conf.
Backup above config first!!!
Usually, the usage of www and non-www is: when it found a www, it redirected to non-www, or vice versa. You first can configure in 000-default.conf:
<VirtualHost *:80>
   ServerAdmin webmaster@localhost
   DocumentRoot /var/www/public
   ServerName www.yourdomain.com

   <Directory /var/www/public>
        Options Indexes FollowSymLinks
        AllowOverride None
        Require all granted

        Order Allow,Deny
        Allow from All

        FallbackResource /index.php
   </Directory>

    Redirect / https://yourdomain.com/

    ErrorLog ${APACHE_LOG_DIR}/error.log
    CustomLog ${APACHE_LOG_DIR}/access.log combined
</VirtualHost>

<VirtualHost *:80>
    ServerAdmin webmaster@localhost
    DocumentRoot /var/www/public
    ServerName yourdomain.com

    <Directory /var/www/public>
        Options Indexes FollowSymLinks
        AllowOverride None
        Require all granted

        Order Allow,Deny
        Allow from All

        FallbackResource /index.php
    </Directory>

    Redirect / https://yourdomain.com/

    ErrorLog ${APACHE_LOG_DIR}/error.log
    CustomLog ${APACHE_LOG_DIR}/access.log combined
</VirtualHost>
Above config will redirect non-https www and non-www to https://yourdomain.com .
Now, let’s configure default-ssl.conf as follow:
<IfModule mod_ssl.c>

    <VirtualHost _default_:443>
        ServerAdmin webmaster@localhost
        ServerName www.yourdomain.com
        DocumentRoot /var/www/public

        <Directory /var/www/public>
            Options Indexes FollowSymLinks
            AllowOverride None
            Require all granted

            Order Allow,Deny
            Allow from All

            FallbackResource /index.php
        </Directory>

        Redirect / https://yourdomain.com/

        ErrorLog ${APACHE_LOG_DIR}/error.log
        CustomLog ${APACHE_LOG_DIR}/access.log combined

        SSLEngine on

        SSLCertificateFile    /etc/letsencrypt/live/yourdomain.com/fullchain.pem
        SSLCertificateKeyFile /etc/letsencrypt/live/yourdomain.com/privkey.pem

        <FilesMatch "\.(cgi|shtml|phtml|php)$">
            SSLOptions +StdEnvVars
        </FilesMatch>
        <Directory /usr/lib/cgi-bin>
            SSLOptions +StdEnvVars
        </Directory>
    </VirtualHost>

    <VirtualHost _default_:443>
        ServerAdmin webmaster@localhost
        ServerName yourdomain.com
        DocumentRoot /var/www/public

        <Directory /var/www/public>
            Options Indexes FollowSymLinks
            AllowOverride None
            Require all granted

            Order Allow,Deny
            Allow from All

            FallbackResource /index.php
        </Directory>

        ErrorLog ${APACHE_LOG_DIR}/error.log
        CustomLog ${APACHE_LOG_DIR}/access.log combined

        SSLEngine on

        SSLCertificateFile    /etc/letsencrypt/live/yourdomain.com/fullchain.pem
        SSLCertificateKeyFile /etc/letsencrypt/live/yourdomain.com/privkey.pem

        <FilesMatch "\.(cgi|shtml|phtml|php)$">
            SSLOptions +StdEnvVars
        </FilesMatch>
        <Directory /usr/lib/cgi-bin>
            SSLOptions +StdEnvVars
        </Directory>
    </VirtualHost>

</IfModule>
Above config set certificate to location the Certbot print the SSL key. As the SSL is always catched too early, both www and non-www need to have SSL key config!
Ok, configuration seems complete, let’s run the following commands to enable the configs:
sudo ufw allow in "Apache Full"
sudo a2enmod ssl
sudo a2enmod headers
sudo a2enconf ssl-params

# enable default-ssl.conf
# if you have different name, then provide different name
sudo a2ensite default-ssl

# you can add as many config as you created, eg:
# sudo a2ensite yourdomain.com.conf
# sudo a2ensite yourdomain.com-ssl.conf

sudo apache2ctl configtest
Now, its done, time to test:
/usr/bin/systemctl reload apache2 && /usr/bin/systemctl restart apache2
Let’s open the site:
1. http://www.yourdomain.com > redirected to > https://yourdomain.com
2. http://yourdomain.com > redirected to > https://yourdomain.com
3. https://www.yourdomain.com > redirected to > https://yourdomain.com
4. https://yourdomain.com don't redirect as already in target.
and if you’re lucky, you will get redirected to SSL with configured SSL success!
Note:
Let’s Encrypt has expiration on 3 months, and you need to re-generate it before it expired, you can re-generate it monthly via cronjob if needed:
Run crontab -e command and add the following entry:
0 0 1 * * echo "2" | /usr/bin/certbot certonly --apache --domains yourdomain.com,www.yourdomain.com && /usr/bin/systemctl reload apache2 && /usr/bin/systemctl restart apache2
that will regenerate next month at date 1th at 00:00, and next month, repetitively, and save (CTRL + X if you use nano, or !wq if you’re using vim).
That’s it 😉
Practical Regex 3: Using Nested Negative Lookahead
So, you need to verify a statement, that in the statement, something has NOT followed with other thing, except continue with another thing, for example:
I like foo                 << - not allowed
I like fooSomeRandomString << - not allowed
I like food                << - allowed
I like football            << - allowed
I like drawing             << - allowed
I dislike drawing          << - not allowed
First, let’s create a regex to make “I like” not followed with “foo” with Negative Lookahead “(?!foo)”:
I like (?!foo)[^ ]+
Above regex will match only for “I like drawing”, ref https://regex101.com/r/hAsvYH/1,
Important note:
I used caret for negation character class [^ ] for not space just to ensure it exactly has word found next with non space after collection of character so we can see the result of next word.
Next, continue with another requirement, except “food” and “football”, so we make another Negative Lookahead inside Negative Lookahead “(?!foo(?!d|tball))”:
I like (?!foo(?!d|tball))[^ ]+
Above regex will verify next followed with “foo” is allowed if next of “foo” is “d” or “tball”, so it will matches:
I like food
I like football
I like drawing
ref https://regex101.com/r/hAsvYH/2
Next, how to get “food”, “footbal”, and “drawing”? You can use “Named Capture Group” that cover “Nested Negative Lookahead + “character class [^ ]+” so the word next will be included as a “Named Capture Group”, like the following:
I like (?<like>(?!foo(?!d|tball))[^ ]+)
Above, the word result is captured with named “like”, ref https://regex101.com/r/hAsvYH/3
Let’s use real code to get it, for example, with PHP:
$text = <<<TEXT
I like foo                 << - not allowed
I like fooSomeRandomString << - not allowed
I like food                << - allowed
I like football            << - allowed
I like drawing             << - allowed
I dislike drawing          << - not allowed
TEXT;

$pattern = '#I like (?<like>(?!foo(?!d|tball))[^ ]+)#';
preg_match_all($pattern, $text, $matches);

foreach($matches['like'] as $like) {
    echo $like . PHP_EOL;
}
That’s it 😉
References:
How to Update to PHP 7.4 Typed Property Without BC Break with Rector
In Rector 0.12.9, `TypedPropertyRector` is not configurable, it will only change:
– private property
– protected property on final class without extends
In Rector 0.12.16, `TypedPropertyRector` has configurable to allow change protected and public modifier as well as far when possible with new configurable:
   $services->set(TypedPropertyRector::class)
        ->configure([
            TypedPropertyRector::INLINE_PUBLIC => true,
        ]);
This Article is valid for Rector <= 0.12.8
Typed Property is one of the PHP 7.4 feature that allow to write that previously like this:
namespace Lib;

class SomeClass
{
    /** @var int */
    public $a;

    /** @var string */
    protected $b;

    /** @var bool */
    private $c;
}
to this:
namespace Lib;

class SomeClass
{
    public int $a;

    protected string $b;

    private bool $c;
}
If you follow Semver for versioning, and you don’t want to update to major change, eg: version 1 to version 2, changing this will make Break Backward Compatibility, for example:
namespace Lib;

class SomeClass
{
    protected string $b;
}
has child in application consumer:
namespace App;

use Lib\SomeClass;

class AChild extends SomeClass
{
    protected $b;
}
will result a fatal error:
Fatal error: Type of AChild::$b must be string (as in class SomeClass)
see https://3v4l.org/X9Yvd . To avoid that, you should only change to private modifier only, so, the change will only to private property:
namespace Lib;

class SomeClass
{
    /** @var int */
    public $a;

    /** @var string */
    protected $b;

-    /** @var bool */
-    private $c;
+    private bool $c;
}
Want to automate that? You can use Rector for it. First, let say, we have a re-usable package that can be consumed in our applications, with the following package structure:
lib
├── composer.json
├── composer.lock
├── src
│   └── SomeClass.php
with composer.json config like this:
{
    "require": {
        "php": "^7.4"
    },
    "autoload": {
        "psr-4": {
            "Lib\\": "src/"
        }
    }
}
Your package will be hosted in packagist or your own server.
Now, what you need is require the rector as dev dependency by go to lib directory:
cd lib/
composer require --dev rector/rector
Rector has rule named TypedPropertyRector, that part of SetList::PHP_74 constant.
It default will update all modifiers:
- public
- protected
- private
If you are using on projects that not re-usable project, you can just use SetList::PHP_74 constant as is.
For our use case, you can override it by configure it to only apply to private property only.
You can create a rector.php configuration inside the root of lib directory as follow:
<?php

declare(strict_types=1);

use Rector\Core\Configuration\Option;
use Rector\Core\ValueObject\PhpVersion;
use Rector\Php74\Rector\Property\TypedPropertyRector;
use Rector\Set\ValueObject\SetList;
use Symfony\Component\DependencyInjection\Loader\Configurator\ContainerConfigurator;

return static function (ContainerConfigurator $containerConfigurator): void {
    $parameters = $containerConfigurator->parameters();
    $parameters->set(Option::PATHS, [
        __DIR__ . '/src'
    ]);
    $parameters->set(Option::PHP_VERSION_FEATURES, PhpVersion::PHP_74);

    // import php 7.4 set list for php 7.4 features
    $containerConfigurator->import(SetList::PHP_74);

    // set Typed Property only for private property
    $services = $containerConfigurator->services();
    $services->set(TypedPropertyRector::class)
        ->call('configure', [[
            TypedPropertyRector::PRIVATE_PROPERTY_ONLY => true,
        ]]);
};
Above, we import php 7.4 set list, with configured TypedPropertyRector for update to typed property to only change private property only.
Now, let’s run rector to see the diff and verify:
cd lib
vendor/bin/rector --dry-run

Everything seems correct! Let’s apply the change:
cd lib
vendor/bin/rector

Now, you have typed property in your code!
That’s it!
Practical Regex 2: Using Named Backreference in Positive Lookahead
When we have the following namespaced classname value:
App\Domain\Foo\FooRepository
and our task is to get “Foo” value as Domain group with the criteria:
- must have
App\Domain\prefix - must have
\$Domainname + “Repository” suffix which$Domainmust match previous sub-namespace, on this case, “Foo”
we can use the following regex with Positive Lookbehind to filter prefix and Positive Lookahead to filter suffix:
(?<=App\\Domain\\)(?<Domain>[A-Z][a-z]{1,})(?=\\\1Repository)
Above, we find $Domain with App\Domain\ before it with Positive Lookbehind, and $DomainRepository after it with Positive Lookahead.
We are using backreference with \1 to match the exact same text of the first capturing group. If you code in PHP, you can do like this:
$pattern   = '#(?<=App\\\\Domain\\\\)(?<Domain>[A-Z][a-z]{1,})(?=\\\\\1Repository)#';
$className = 'App\Domain\Foo\FooRepository';

preg_match($pattern, $className, $matches);
if ($matches !== []) {
    echo $matches['Domain'];
}
What if the code is getting more complex, like in my previous post for named capturing group, you need to remember the numbered index! To handle it, you can use named backreference for it, so the regex will be:
(?<=App\\Domain\\)(?<Domain>[A-Z][a-z]{1,})(?=\\\k<Domain>Repository)
Now, you are exactly know what backrefence reference to. If you code in PHP, you can do like this:
$pattern   = '#(?<=App\\\\Domain\\\\)(?<Domain>[A-Z][a-z]{1,})(?=\\\\\k<Domain>Repository)#';
$className = 'App\Domain\Foo\FooRepository';

preg_match($pattern, $className, $matches);
if ($matches !== []) {
    echo $matches['Domain'];
}
That’s it 😉
Practical Regex 1: Using Named Capturing Groups
Still using numbered group of capture value in Regex? You may forget, or the index changed if the requirement changed. For example, you want to get a csrf value from a form field with the following regex example:
name="csrf" value="(.{32})"
For input field csrf with 32 chars value “4X0ZfDKr71KHCec7SOkoJ5onq1PTCN3v”, you want to get the value, you will need to get index 1 for it with PHP:
<?php

$pattern = '#name="csrf" value="(.{32})"#';
$content = <<<'HTML_CONTENT'
<form>
    <input type="hidden" name="csrf" value="4X0ZfDKr71KHCec7SOkoJ5onq1PTCN3v" />
    <input type="submit" />
</form>
HTML_CONTENT;

preg_match($pattern, $content, $matches);
if ($matches !== []) {
    echo $matches[1];
}
To handle the possible forgotten index or changed index that can create a bug, you can use named capturing groups, so you can change to:
name="csrf" value="(?<csrf_value>.{32})"
Now, you can get it easily:
<?php

$pattern = '#name="csrf" value="(?<csrf_value>.{32})"#';
$content = <<<'HTML_CONTENT'
<form>
    <input type="hidden" name="csrf" value="4X0ZfDKr71KHCec7SOkoJ5onq1PTCN3v" />
    <input type="submit" />
</form>
HTML_CONTENT;

preg_match($pattern, $content, $matches);
if ($matches !== []) {
    echo $matches['csrf_value'];
}
That’s it 😉
Install Imagick extension for PHP 8 in macOS Big Sur
I am really grateful I’ve had a chance to have the Mac mini M1 on a new year 2021. It’s really fast, even I only use 8 gigs ram version! Also, the software that in my old mac no longer can use its latest update – like php with homebrew – is back! In this post, I will show you how to install imagick for PHP 8 in macOS Big Sur for it.
First, I assume that you already have Homebrew installed. Next is install PHP 8, we can use shivammathur/php for it, the installation steps are in its readme.
When PHP 8 installed, we can ensure that imagemagick already installed, if not, if we can install via Homebrew as well:
$ brew install imagemagick
Now, time to install imagick. There is no imagick release yet for php 8, but we can install the dev-master already following this issue :
$ git clone https://github.com/Imagick/imagick
$ cd imagick
$ phpize && ./configure
$ make
$ sudo make install
When you run make, if you got the following error:
/opt/homebrew/Cellar/php/8.0.0_1/include/php/ext/pcre/php_pcre.h:23:10: fatal error: 'pcre2.h' file not found
You can copy installed pcre2.h from Homebrew:
cp /opt/homebrew/Cellar/pcre2/10.36/include/pcre2.h .
Next, you can re-run :
$ make
$ sudo make install
After it installed, you can register imagick.so to /opt/homebrew/etc/php/8.0/php.ini:
extension="imagick.so"
Now, let’s check if it is installed:
➜  ~ php -a
Interactive shell

php > echo phpversion('imagick');
@PACKAGE_VERSION@
Yes, above @PACKAGE_VERSION@ should be just fine. That’s it!
Install php 8.0 in MacOS Sierra with Macports
Yes, you read it right. I live in the past, with old hardware, with legacy operating system. There is homebrew that previously still works in php 7.4 in early releases, but now no longer works. There is an alternative like a one click install app like MAMP PRO but didn’t support php 8.0 yet. XAMPP ? not really extension installable user friendly (as far as I tried)!
I don’t want to lost hope, I give a Macports a try, and it works while it not documented in the wiki yet. If you are using MacOS Sierra and want to try, you can do the following steps:
1. First, you need to have Macports installed first, that we can read in the documentation.
2. Install php 8.0
sudo port install php80
You will get the following note in the end of installation process:
To customize php80, copy /opt/local/etc/php80/php.ini-development (if this is a development server) or /opt/local/etc/php80/php.ini-production (if this is a production server) to /opt/local/etc/php80/php.ini and then make changes.
You can follow that if you want to changes the PHP configuration.
3. Install common extensions
For example, you will need intl and mbstring extension, you can run:
sudo port install php80-intl
sudo port install php80-mbstring
You can search already available extensions in the search page.
4. Now, you can check if it is actually installed:
php80 --version

That’s it 😉
How to Create Typo Variable Fixer with Rector
Rector is a code refactoring tool that can help us with major code changes (like upgrade legacy code) or daily work. There are already many rules that ready to use for us.
What if we want a custom rule, like we want a daily work can to do “Typo” check in variables? In this post, I want to show you how to create a Typo Variable Fixer with Rector, a custom Rector rule!
Preparation
First, let say, we build a new app, we use composer for it with add rector/rector to require-dev:
composer init


  Welcome to the Composer config generator


This command will guide you through creating your composer.json config.

Package name (<vendor>/<name>) [samsonasik/how-to-create-typo-variable-fixer]: samsonasik/app

Description []: App Demo

Author [Abdul Malik Ikhsan <samsonasik@gmail.com>, n to skip]:

Minimum Stability []:

Package Type (e.g. library, project, metapackage, composer-plugin) []:

License []: MIT

Define your dependencies.

Would you like to define your dependencies (require) interactively [yes]? no
Would you like to define your dev dependencies (require-dev) interactively [yes]? yes
Search for a package: rector/rector
Enter the version constraint to require (or leave blank to use the latest version):

Using version ^0.8.40 for rector/rector

Search for a package:

{
    "name": "samsonasik/app",
    "description": "App Demo",
    "require-dev": {
        "rector/rector": "^0.8.40"
    },
    "license": "MIT",
    "authors": [
        {
            "name": "Abdul Malik Ikhsan",
            "email": "samsonasik@gmail.com"
        }
    ],
    "require": {}
}

Do you confirm generation [yes]? yes
Would you like to install dependencies now [yes]? yes
After it, let say we need an app directory, we can create an app directory and write a php file inside it:
mkdir -p app && touch app/app.php
with file app/app.php content:
<?php

namespace App;

$previuos = 0;
$begining = 1;
$statment = $previuos . ' is lower than ' . $begining;
Yes, there are 3 typos in above file! For example, we will have a sample library.php file for common typos, for example, inside utils directory:
mkdir -p utils && touch utils/library.php
with file utils/library.php content:
<?php

namespace Utils;

return [
    'previous' => ['previuos', 'previuous'],
    'beginning' => ['begining', 'beginign'],
    'statement' => ['statment'],
];
We can setup composer autoload for with add the following to our composer.json file:
    "autoload": {
        "psr-4": {
            "App\\": "app"
        }
    },
    "autoload-dev": {
        "psr-4": {
            "Utils\\": "utils"
        }
    }
After it, run composer dump-autoload command:
composer dump-autoload
The preparation is done!
Create the Typo Fixer Rule
We can follow the Rector‘s documentation to create new custom rule. So, for example, we create TypoVariableFixerRule under own utils/Rector directory:
mkdir -p utils/Rector && touch utils/Rector/TypoVariableFixerRule.php
Our directory will looks like the following:
.
├── app
│   └── app.php
├── composer.json
├── utils
│   ├── Rector
│   │   └── TypoVariableFixerRule.php
│   └── library.php
Now, we can start create the TypoVariableFixerRule:
<?php

declare(strict_types=1);

namespace Utils\Rector;

use PhpParser\Node;
use PhpParser\Node\Expr\Variable;
use Rector\Core\Rector\AbstractRector;
use Rector\Core\RectorDefinition\CodeSample;
use Rector\Core\RectorDefinition\RectorDefinition;

final class TypoVariableFixerRule extends AbstractRector
{
    public function getNodeTypes(): array
    {
        return [Variable::class];
    }

    /**
     * @param Variable $node
     */
    public function refactor(Node $node): ?Node
    {
        return $node;
    }

    public function getDefinition(): RectorDefinition
    {
        return new RectorDefinition(
            'Change Typo in variable', [
                new CodeSample(
                    // code before
                    '$previuos',
                    // code after
                    '$previous'
                ),
            ]
        );
    }
}
Above, we extends AbstractRector for new Rector rule. We operate with nikic/php-parser to do refactor. The getNodeTypes returns the node that we want to refactor, at this case, we want to refactor Variable node in our refactor method.
Before we continue, let’s register our new TypoVariableFixerRule to rector config to ensure it works. We can create rector config as follow:
touch rector.php
with file rector.php content:
<?php

use Rector\Core\Configuration\Option;
use Symfony\Component\DependencyInjection\Loader\Configurator\ContainerConfigurator;
use Utils\Rector\TypoVariableFixerRule;

return static function (ContainerConfigurator $containerConfigurator): void {
    $parameters = $containerConfigurator->parameters();
    $parameters->set(Option::PATHS, [__DIR__ . '/app']);

    $services = $containerConfigurator->services();
    $services->set(TypoVariableFixerRule::class);
};
and test with run:
vendor/bin/rector process
So we see the “Green” OK:

Now, time to make refactor work! We can modify the refactor method:
    public function refactor(Node $node): ?Node
    {
        // get the variable name
        $variableName = $this->getName($node);

        // get the library content
        $library = include 'utils/library.php';

        foreach ($library as $correctWord => $commonTypos) {
            if (! in_array($variableName, $commonTypos, true)) {
                continue;
            }

            $node->name = $correctWord;
            return $node;
        }

        return null;
    }
Above, we find if the variable name is in common typos, then we return node (as variable) with updated its name with the correct word. Now, let’s run it with --dry-run to see the diff that can be made:
vendor/bin/rector process --dry-run
and we can see:

Seems great! Let’s apply the changes:
vendor/bin/rector process

Awesome! We now already make typo fixer succesfully working! Let’s run again, and it will take no effect as already fixed:

That’s it!
Using React.js in Mezzio Application
Ok, in 3 previous JavaScript posts, I posted how to use Vue.js in Mezzio Application. Now, in this post, I will show you how to use React.js in Mezzio Application.
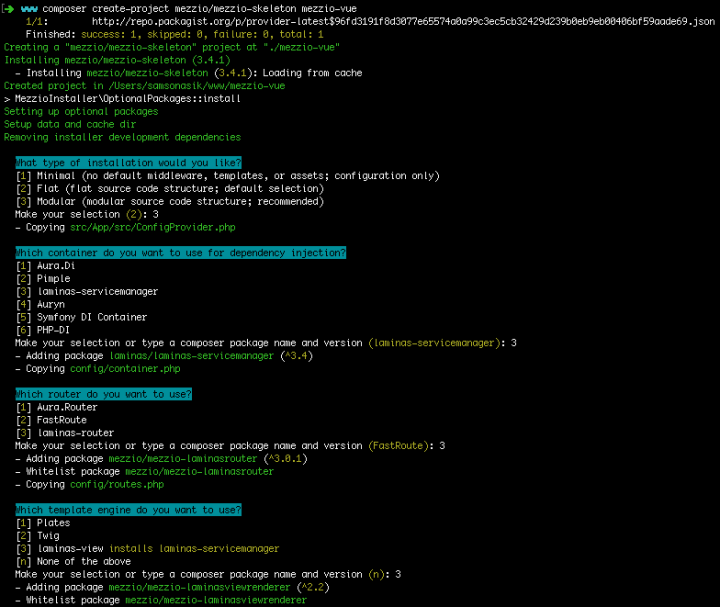
Let’s start with download the mezzio skeleton:
composer create-project mezzio/mezzio-skeleton mezzio-react
I assume next you choose the following options:
- Type of Installation: Modular (3)
- Container: Laminas ServiceManager (3)
- Router: Laminas Router (3)
- Template Engine: Laminas View (3)

Now, we are on the same page!
The scenario is same, we want to create an SPA application. In Mezzio part, to make it work, it require template handling for ajax request.
We can create middleware for that:
<?php

declare(strict_types=1);

namespace App\Middleware;

use Mezzio\Template\TemplateRendererInterface;
use Psr\Http\Message\ResponseInterface;
use Psr\Http\Message\ServerRequestInterface;
use Psr\Http\Server\MiddlewareInterface;
use Psr\Http\Server\RequestHandlerInterface;

class XMLHttpRequestTemplateMiddleware implements MiddlewareInterface
{
    private $template;

    public function __construct(TemplateRendererInterface $template)
    {
        $this->template = $template;
    }

    public function process(ServerRequestInterface $request, RequestHandlerInterface $handler) : ResponseInterface
    {
        if (in_array('XMLHttpRequest', $request->getHeader('X-Requested-With'), true)) {
            (function ($template) {
                $template->layout = false;
            })->bindTo($this->template, $this->template)($this->template);
        }

        return $handler->handle($request);
    }
}
In above middleware, we set template layout to false to disable layout when request has X-Requested-With = XmlHttpRequest as an ajax detection. Let’s register above middleware in ConfigProvider class:
<?php
 // src/App/src/ConfigProvider.php
declare(strict_types=1);

namespace App;

use Laminas\ServiceManager\AbstractFactory\ReflectionBasedAbstractFactory;

class ConfigProvider
{
    // ...
    public function getDependencies() : array
    {
        return [
            'invokables' => [
                 // ...
            ],
            'factories'  => [
                // ..
                Middleware\XMLHttpRequestTemplateMiddleware::class => ReflectionBasedAbstractFactory::class,
            ],
        ];
    }
    // ...
}
and in the pipeline before DispatchMiddleware:
<?php
 // config/pipeline.php
use App\Middleware\XMLHttpRequestTemplateMiddleware;
return function (Application $app, MiddlewareFactory $factory, ContainerInterface $container) : void {
    // ...
    $app->pipe(XMLHttpRequestTemplateMiddleware::class);
    $app->pipe(DispatchMiddleware::class);
    // ...
};
We need to handle 404 Pages that can work in Ajax request, so we can create a new middleware for that, for example: App\Middleware\NotFoundMiddleware:
<?php

declare(strict_types=1);

namespace App\Middleware;

use Laminas\Diactoros\Response\HtmlResponse;
use Mezzio\Template\TemplateRendererInterface;
use Psr\Http\Message\ResponseInterface;
use Psr\Http\Message\ServerRequestInterface;
use Psr\Http\Server\MiddlewareInterface;
use Psr\Http\Server\RequestHandlerInterface;

class NotFoundMiddleware implements MiddlewareInterface
{
    private $template;
    private $config;

    public function __construct(TemplateRendererInterface $template, array $config)
    {
        $this->template = $template;
        $this->config   = $config;
    }

    public function process(ServerRequestInterface $request, RequestHandlerInterface $handler) : ResponseInterface
    {
        return new HtmlResponse(
            $this->template->render($this->config['mezzio']['error_handler']['template_404'])
        );
    }
}
The above middleware need to be registered to ConfigProvider:
<?php
 // src/App/src/ConfigProvider.php
declare(strict_types=1);

namespace App;

use Laminas\ServiceManager\AbstractFactory\ReflectionBasedAbstractFactory;

class ConfigProvider
{
    // ...
    public function getDependencies() : array
    {
        return [
            'invokables' => [
                 // ...
            ],
            'factories'  => [
                // ..
                Middleware\NotFoundMiddleware::class  => ReflectionBasedAbstractFactory::class,
            ],
        ];
    }
    // ...
}
And then, add to config/pipeline after DispatchMiddleware:
<?php
 // config/pipeline.php

use App\Middleware\NotFoundMiddleware;
use App\Middleware\XMLHttpRequestTemplateMiddleware;

return function (Application $app, MiddlewareFactory $factory, ContainerInterface $container) : void {
    // ...
    $app->pipe(XMLHttpRequestTemplateMiddleware::class);
    $app->pipe(DispatchMiddleware::class);
    $app->pipe(NotFoundMiddleware::class);
    // ...
};
Now, let’s add About and Contact page handlers:
1. About Page
<?php
// src/App/src/Handler/AboutPageHandler.php
declare(strict_types=1);

namespace App\Handler;

use Laminas\Diactoros\Response\HtmlResponse;
use Mezzio\Template\TemplateRendererInterface;
use Psr\Http\Message\ResponseInterface;
use Psr\Http\Message\ServerRequestInterface;
use Psr\Http\Server\RequestHandlerInterface;

class AboutPageHandler implements RequestHandlerInterface
{
    private $template;

    public function __construct(TemplateRendererInterface $template)
    {
        $this->template = $template;
    }

    public function handle(ServerRequestInterface $request) : ResponseInterface
    {
        return new HtmlResponse($this->template->render('app::about-page'));
    }
}
With templates:
<!-- src/templates/app/about-page.phtml -->
<h1>About Me</h1>
<p>
    I'm a web developer.
</p>
2. Contact Page
<?php
// src/App/src/Handler/ContactPageHandler.php
declare(strict_types=1);

namespace App\Handler;

use Laminas\Diactoros\Response\HtmlResponse;
use Mezzio\Template\TemplateRendererInterface;
use Psr\Http\Message\ResponseInterface;
use Psr\Http\Message\ServerRequestInterface;
use Psr\Http\Server\RequestHandlerInterface;

class ContactPageHandler implements RequestHandlerInterface
{
    private $template;

    public function __construct(TemplateRendererInterface $template)
    {
        $this->template = $template;
    }

    public function handle(ServerRequestInterface $request) : ResponseInterface
    {
        return new HtmlResponse($this->template->render('app::contact-page'));
    }
}
With templates:
<!-- src/templates/app/contact-page.phtml -->
<h1>Contact Me</h1>
<p>
    You can contact me via <a href="mailto: foo@bar.baz.com">foo@bar.baz.com</a>
</p>
Handlers Registration
Both AbooutPageHandler and ContactPageHandler need to be registered in ConfigProvider class:
<?php
 // src/App/src/ConfigProvider.php
declare(strict_types=1);

namespace App;

use Laminas\ServiceManager\AbstractFactory\ReflectionBasedAbstractFactory;

class ConfigProvider
{
    // ...
    public function getDependencies() : array
    {
        return [
            'invokables' => [
                 // ...
            ],
            'factories'  => [
                // ..
                Handler\AboutPageHandler::class => ReflectionBasedAbstractFactory::class,
                Handler\ContactPageHandler::class => ReflectionBasedAbstractFactory::class,
                // ...
            ],
        ];
    }
    // ...
}
and in the routes:
<?php
// config/routes.php
return static function (Application $app, MiddlewareFactory $factory, ContainerInterface $container) : void {
    // ...
    $app->get('/about', App\Handler\AboutPageHandler::class, 'about');
    $app->get('/contact', App\Handler\ContactPageHandler::class, 'contact');
};
Now, we have 3 html pages: Home, About, and Contact. It’s enough for demonstration.
JS dependencies
We can register js dependencies in the layout by add the following js:
<?php
// src/App/templates/layout/default.phtml

$this->headLink()
    ->prependStylesheet('https://use.fontawesome.com/releases/v5.12.1/css/all.css')
    ->prependStylesheet('https://maxcdn.bootstrapcdn.com/bootstrap/4.4.1/css/bootstrap.min.css');
$this->inlineScript()

    ->prependFile('/js/app.js', 'module')
    ->prependFile('https://unpkg.com/react-router-dom@5.2.0/umd/react-router-dom.js')
    ->prependFile('https://unpkg.com/html-react-parser@0.13.0/dist/html-react-parser.js')
    ->prependFile('https://unpkg.com/dompurify@2.0.12/dist/purify.js')
    ->prependFile('https://unpkg.com/react-dom@16.13.1/umd/react-dom.production.min.js')
    ->prependFile('https://unpkg.com/react@16.13.1/umd/react.production.min.js')

    ->prependFile('https://maxcdn.bootstrapcdn.com/bootstrap/4.4.1/js/bootstrap.min.js')
    ->prependFile('https://code.jquery.com/jquery-3.5.0.min.js');
?>
React dependencies are react, react-dom, html-react-parser, and react-router-dom. The dompurify will be used to purify the js before displaying. For /js/app.js, that’s our code in public directory to make routing definition. In the layout, we need element for mounting, let’s define is as “root” under body:
<!-- // src/App/templates/layout/default.phtml -->
<body class="app">
    <div id="root">

    </div>
    <?=$this->inlineScript()?>
</body>
Now, we can define a Page component creator function, eg: createPage(), we can create a js file for it that will be consumed by /js/app.js under public directory later:
// public/js/create-page.js
let createPage = (title) => class Page extends React.Component {
    constructor(props) {
        super(props);
        this.state = { content: ''};
    }

    componentDidMount() {
        new Promise( (resolve) => {
            fetch(
                this.props.location.pathname,
                {
                    method: 'GET',
                    headers: {
                        'X-Requested-With': 'XMLHttpRequest',
                    }
                }
            ).then(response =>  resolve(response.text()));
        }).then(result => {
            this.setState({ content : result });
            document.title = title;
        });
    }

    render() {
      return React.createElement(
            'div',
            {
                className : "app-content",
            },
            React.createElement(
                "main",
                {
                    className : "container"
                },
                HTMLReactParser(DOMPurify.sanitize(this.state.content))
            )
        );
    }
}

export default createPage;
Above, we use location route path page, and change title after content grabbed based on passed title parameter. We use HTMLReactParser to generate html for the raw html from the server response.
Now, let create a Navigation, we can create Navigation component, eg, in /js/Navigation.js under public directory:
// public/js/Navigation.js
const {
    NavLink
} = ReactRouterDOM;

const {
    Component,
    createElement
} = React;

class Navigation extends Component {
    render() {
      return createElement(
            'nav',
            {
                className : "navbar navbar-expand-sm navbar-dark bg-dark fixed-top",
                role: "navigation"
            },
            createElement(
                'div',
                {
                    className: "container"
                },
                createElement(
                    'div',
                    {
                        className: "navbar-header"
                    },
                    createElement(
                        'button',
                        {
                            className: "navbar-toggler",
                            "data-toggle": "collapse",
                            "data-target": "#navbarCollapse",
                            "aria-controls": "#navbarCollapse",
                            "aria-expanded": "false",
                            "aria-label": "Toggle navigation"
                        },
                        createElement(
                            'span',
                            {
                                className: "navbar-toggler-icon"
                            }
                        )
                    ),
                    createElement(
                        NavLink,
                        {
                            to: "/",
                            className: "navbar-brand"
                        },
                        createElement(
                            'img',
                            {
                                src: "https://docs.laminas.dev/img/laminas-mezzio-rgb.svg",
                                alt: "Laminas Mezzio",
                                height: 56
                            }
                        )
                    )
                ),
                createElement(
                    'div',
                    {
                        className: "collapse navbar-collapse",
                        id: "navbarCollapse"
                    },
                    createElement(
                        "ul",
                        {
                            className: "navbar-nav mr-auto"
                        },
                        createElement(
                            "li",
                            {
                                className: "nav-item"
                            },
                            createElement(NavLink, { className: 'nav-link', to: "/", exact: true }, "Home")
                        ),
                        createElement(
                            "li",
                            {
                                className: "nav-item"
                            },
                            createElement(NavLink, { className: 'nav-link', to: "/about", exact: true }, "About")
                        ),
                        createElement(
                            "li",
                            {
                                className: "nav-item"
                            },
                            createElement(NavLink, { className: 'nav-link', to: "/contact", exact: true }, "Contact")
                        )
                    )
                )
            )
        );
    }
}

export default Navigation;
Above, we define the navigation, with add “active” class on link selected.
Finally, our /js/app.js under public directory that consume createPage function and Navigation component to be used for routing definition and navigation.
// public/js/app.js
import createPage from './create-page.js';
import Navigation from './Navigation.js';

const {
    BrowserRouter,
    Switch,
    Route
} = ReactRouterDOM;

const Main = () => React.createElement(
    "main",
    null,
    React.createElement(
        Switch,
        null,
        React.createElement(
            Route, {
                exact: true,
                path: "/",
                component: createPage('Home')
            }
        ),
        React.createElement(
            Route, {
                exact: true,
                path: "/about",
                component: createPage('About')
            }
        ),
        React.createElement(
            Route, {
                exact: true,
                path: "/contact",
                component: createPage('Contact')
            }
        ),
        React.createElement(
            Route, {
                exact: true,
                path: "*",
                component: createPage('404 Page')
            }
        )
    )
);

const Header = () => React.createElement(
    'header',
    {
        className: 'app-header'
    },
    React.createElement(Navigation)
);

const App = () => React.createElement(
    "div",
    null,
    React.createElement(Header, null),
    React.createElement(Main, null)
);

ReactDOM.render(
    React.createElement(
        BrowserRouter,
        null,
        React.createElement(App, null)
    ),
    document.getElementById('root')
);

// https://reactjs.org/docs/react-without-jsx.html
// https://www.pluralsight.com/guides/just-plain-react
// https://codepen.io/pshrmn/pen/YZXZqM?editors=1010
Now, if we check, we will get SPA working:

That’s it! I uploaded the sample source code at github: https://github.com/samsonasik/mezzio-react
References:
– https://reactjs.org/docs/react-without-jsx.html
– https://www.pluralsight.com/guides/just-plain-react
– https://codepen.io/pshrmn/pen/YZXZqM?editors=1010
Using Vuex’s Vue.js and sessionStorage combo for searchable get api data and cached in Mezzio Application
So, this is the 3rd post about usage of Vue.js in Mezzio Application. If you haven’t read my previous 2 posts, I suggest you to read them first:
- Using Vue.js in Mezzio Application
- Using Vue.compile() to activate Vue component’s data and method in Mezzio Application
Ok, let’s continue. Now, we are going to use Vuex as state management (when without refresh) and native sessionStorage combo to handle searched data in next refresh to avoid unnecessary re-query data as previously already searched. For note, I use sessionStorage so next close – re-open browser will clear the data.
Load the Vuex Library
We can load Vuex library in the layout:
<?php
// src/App/templates/layout/default.phtml
// ...
    ->prependFile('/js/app.js')
    ->prependFile('https://unpkg.com/vuex@3.4.0/dist/vuex.js')
    ->prependFile('https://unpkg.com/vue-router@3.3.2/dist/vue-router.js')
    ->prependFile('https://unpkg.com/vue@2.6.11/dist/vue.js')
// ...
The Data
For example, we want to display portfolio data via API. For example, we have the following portfolio array data example (in real life, you an use DB ofcourse)
<?php
// data/portfolio.php
return [
    [
        'id'    => 1,
        'title' => 'Website A',
        'image' => 'https://via.placeholder.com/150/FF0000/FFFFFF?text=website%20A',
        'link'  => 'https://www.website-a.com',
    ],
    [
        'id'    => 2,
        'title' => 'Website B',
        'image' => 'https://via.placeholder.com/150/0000FF/808080?text=website%20B',
        'link'  => 'https://www.website-b.com',
    ],
    [
        'id'    => 3,
        'title' => 'Website C',
        'image' => 'https://via.placeholder.com/150/000000/FFFFFF?text=website%20C',
        'link'  => 'https://www.website-c.com',
    ]
];
If you use GIT with mezzio skeleton, the data need to be registered to .gitignore to allow to be committed:
# data/.gitignore
*
!cache
!cache/.gitkeep
!.gitignore
!portfolio.php
The API
Now, time to create API page, for example App\Handler\Api\PortfolioApiHandler:
<?php
// src/App/src/Handler/Api/PortfolioApiHandler.php
declare(strict_types=1);

namespace App\Handler\Api;

use Laminas\Diactoros\Response\JsonResponse;
use Psr\Http\Message\ResponseInterface;
use Psr\Http\Message\ServerRequestInterface;
use Psr\Http\Server\RequestHandlerInterface;

class PortfolioApiHandler implements RequestHandlerInterface
{
    public function handle(ServerRequestInterface $request) : ResponseInterface
    {
        $data  = include './data/portfolio.php';
        $keyword = $request->getQueryParams()['keyword'] ?? '';

        if ($keyword) {
            $data = array_filter($data, function ($value) use ($keyword) {
                return (
                    strpos(strtolower($value['title']), strtolower($keyword)) !== false
                    ||
                    strpos(strtolower($value['link']), strtolower($keyword)) !== false
                );
            });
        }

        return new JsonResponse($data);
    }
}
Above, we use array_filter to search portfolio data for title and link with keyword query parameter.
Next, we can register to our ConfigProvider class:
<?php
 // src/App/src/ConfigProvider.php
declare(strict_types=1);

namespace App;

use Laminas\ServiceManager\AbstractFactory\ReflectionBasedAbstractFactory;

class ConfigProvider
{
    // ...
    public function getDependencies() : array
    {
        return [
            'invokables' => [
                 // ...
            ],
            'factories'  => [
                // ..
                Handler\Api\PortfolioApiHandler::class => ReflectionBasedAbstractFactory::class,
            ],
        ];
    }
    // ...
}
and in the routes:
<?php
// config/routes.php
return static function (Application $app, MiddlewareFactory $factory, ContainerInterface $container) : void {
    // ...
    $app->get('/api/portfolio', App\Handler\Api\PortfolioApiHandler::class, 'api-portfolio');
};
The Page
We need to consume the API via a page, for example, we create handle for it: App\Handler\PortfolioPageHandler:
<?php
// src/App/src/Handler/PortfolioPageHandler.php
declare(strict_types=1);

namespace App\Handler;

use Laminas\Diactoros\Response\HtmlResponse;
use Mezzio\Template\TemplateRendererInterface;
use Psr\Http\Message\ResponseInterface;
use Psr\Http\Message\ServerRequestInterface;
use Psr\Http\Server\RequestHandlerInterface;

class PortfolioPageHandler implements RequestHandlerInterface
{
    private $template;

    public function __construct(TemplateRendererInterface $template)
    {
        $this->template = $template;
    }

    public function handle(ServerRequestInterface $request) : ResponseInterface
    {
        return new HtmlResponse($this->template->render('app::portfolio-page'));
    }
}
Next, we can register to our ConfigProvider class:
<?php
 // src/App/src/ConfigProvider.php
declare(strict_types=1);

namespace App;

use Laminas\ServiceManager\AbstractFactory\ReflectionBasedAbstractFactory;

class ConfigProvider
{
    // ...
    public function getDependencies() : array
    {
        return [
            'invokables' => [
                 // ...
            ],
            'factories'  => [
                // ..
                Handler\Api\PortfolioApiHandler::class => ReflectionBasedAbstractFactory::class,
                Handler\PortfolioPageHandler::class    => ReflectionBasedAbstractFactory::class,
            ],
        ];
    }
    // ...
}
and in the routes:
<?php
// config/routes.php
return static function (Application $app, MiddlewareFactory $factory, ContainerInterface $container) : void {
    // ...
    $app->get('/api/portfolio', App\Handler\Api\PortfolioApiHandler::class, 'api-portfolio');
    $app->get('/portfolio', App\Handler\PortfolioPageHandler::class, 'portfolio');
};
The Template
For view, we need to display portfolio data with allow to search by keyword via input text. We can create view as follow:
<!-- src/App/templates/app/portfolio-page.phtml-->
Keyword: <input type="keyword" id="keyword" v-on:input="this.$parent.search" v-on:focus="this.$parent.search"/> <br /><br />

<table class="table">
	<tr>
		<th>Title</th>
		<th>Image</th>
        <th>Link</th>
	</tr>

    <tr v-if="this.$parent.portfolio.length == 0">
        <td colspan="3" class="text-center">No portfolio found.</td>
    </tr>

    <tr v-for="loop in this.$parent.portfolio" :key="loop.id">
        <td>{{ loop.title }}</td>
        <td><img :src="`${ loop.image }`" /></td>
        <td><a v-bind:href="`${ loop.link }`">{{ loop.link }}</a></td>
    </tr>
</table>

<script type="application/javascript">
const store = new Vuex.Store({
    state: {
        portfolio : {}
    },
    mutations: {
        search (state, data) {
            sessionStorage.setItem('search-' + data.keyword, JSON.stringify(data.value));
            state.portfolio[data.keyword] = data.value;
        }
    }
});

document.querySelector('#keyword').focus();
</script>
In Vue.js template, we can fill JavaScript with “application/javascript” script type. Above, I initialize Vuex’s Store instance with definition of portfolio state data that on search mutation, set stringified object data.value into sessionStorage item based on keyword and fill the state.portfolio[data.keyword] with data.value. We will fill data as keyword and value later in the public/js/app.js. On very first page accessed, we set focus to keyword text field that trigger search function we register in public/js/app.js when define portfolio page component. So, we can finally loop the data searched.
The JavaScript
In public/js/app.js, now, we can portfolio component with the following defintion:
const routes = [
    // ... other page definition here ...
    {
        path: '/portfolio',
        component: createPage(
            'portfolio',
            {
                portfolio : []
            },
            {
                search: function (e) {
                    let keyword = e.target.value;

                    if (typeof store.state.portfolio[keyword] !== 'undefined') {
                        this.portfolio = store.state.portfolio[keyword];

                        return;
                    }

                    if (sessionStorage.getItem('search-' + keyword)) {
                        portfolio     = JSON.parse(sessionStorage.getItem('search-' + keyword));
                        store.commit('search', { keyword: keyword, value: portfolio });
                        this.portfolio = portfolio;

                        return;
                    }

                    (async () => {
                        await new Promise( (resolve) => {
                            fetch(
                                '/api/portfolio?keyword=' + keyword,
                                {
                                    method: 'GET',
                                    headers: {
                                        'Accept': 'application/json',
                                    }
                                }
                            ).then(response =>  resolve(response.json()));
                        }).then(result => this.portfolio = result);

                        store.commit('search', { keyword: keyword, value: this.portfolio });
                    })();
                }
            }
        ),
        meta: {
            title: 'My Portfolio'
        }
    }
];
Above, in definition of portfolio component, we define a portfolio data attribute to empty array. On search function (that we know it triggered in template input focus and input event), we have the following flow:
a. get keyword from e.target.value as keyword input value
b. check if Vuex store.state.portfolio[keyword] not undefined, means it already in Vuex stage, then fill portfolio data attribute with it, then return early.
c. check if there is session storage data with item key “search-” + keyword value, means it already in session storage, then fill portfolio data attribute with its parsed to object from json stringified data, then return early.
d. otherwise, use async/await function to fill portfolio data attribute, and then commit to Vuex store.
Last but not least, add link to /portfolio page in the layout:
<div class="collapse navbar-collapse" id="navbarCollapse">
    <!-- other menu here -->

    <li class="nav-item">
        <router-link to="/portfolio" class="nav-link">Portfolio</router-link>
    </li>

</div>
That’s it, now we have fully functional searchable and cached even on refresh, unless browser is closed and re-open.

I published the code at https://github.com/samsonasik/mezzio-vue if you want to give it a try 😉
Refs:
Using Vue.compile() to activate Vue component’s data and method in Mezzio Application
In previous post, we already tried create an SPA application with template rendered via Fetch for XHR purpose. What if we want to call data or/and method in template? With v-html, we can’t! The way we can do is make it compiled with Vue.compile(). Let’s check the JS part:
createPage = (name, object = {}, methods = {}) => {
    return Vue.component('page-' + name, {
        data    : () => Object.assign({content: ''}, object),
        methods : methods,
        mounted () {
            (new Promise( (resolve) => {
                fetch(
                    this.$route.path,
                    {
                        method: 'GET',
                        headers: {
                            'X-Requested-With': 'XMLHttpRequest',
                        }
                    }
                ).then(response =>  resolve(response.text()));
            })).then(result => this.content = result);
        },
        render : function (c) {
            if (this.content == '') {
                return;
            }

            return c(Vue.compile('<div>' + this.content + '</div>'));
        }
    });
}

const routes = [
    { path: '/', component: createPage('home'), meta: {
        title: 'Home'
    } },
    { path: '/about', component: createPage(
        'about',
        {
            name: 'Abdul Malik Ikhsan'
        },
        {
            hit: () => alert('This alert already proof that I am a web developer!')
        }
    ), meta: {
        title: 'About Me'
    } },
    { path: '/contact', component: createPage('contact'), meta: {
        title: 'Contact Me'
    } },
    { path: "*", component: createPage('404'), meta: {
        title: '404 Not Found'
    } }
];

const router = new VueRouter({
    routes,
    base: '/',
    mode: 'history',
    linkExactActiveClass: "active"
});

router.afterEach(to => document.title = to.meta.title);

vue = new Vue({
    router
}).$mount('#root');
In above JS, first, I create a createPage function that in 2nd parameter, can pass custom data besides the current content data, and in 3rd parameter, can pass custom methods definition. With content fetched that assigned to content data, finally, we use it in the Vue.compile() on render.
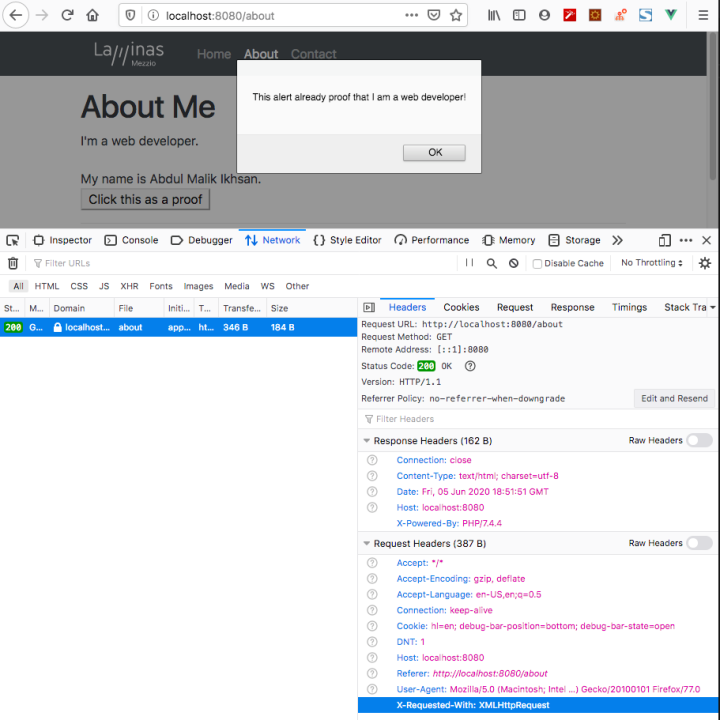
The another special part is in the template part, it requires to use this.$parent to get parent attribute/method. For example, on the ‘about’ page above, we need to get name data, and can call the hit method, we can do like the following:
<!-- src/templates/app/about-page.phtml -->
<h1>About Me</h1>
<p>
    I'm a web developer. My name is {{ this.$parent.name }}. <br />
    <button v-on:click="this.$parent.hit">Click this as a proof</button>
</p>
That’s it, now you can open the about page and can see like the following:
I uploaded the sample source code at github, if you need to see what the diff between my previous post and this, you can check this PR https://github.com/samsonasik/mezzio-vue/pull/1 😉
Refs:
– https://vuejs.org/v2/api/#Vue-compile
– https://vuejs.org/v2/guide/render-function.html#Functional-Components
– https://stackoverflow.com/questions/51548729/vuejs-vue-app-render-method-with-dynamic-template-compiled-is-throwing-some/51552701
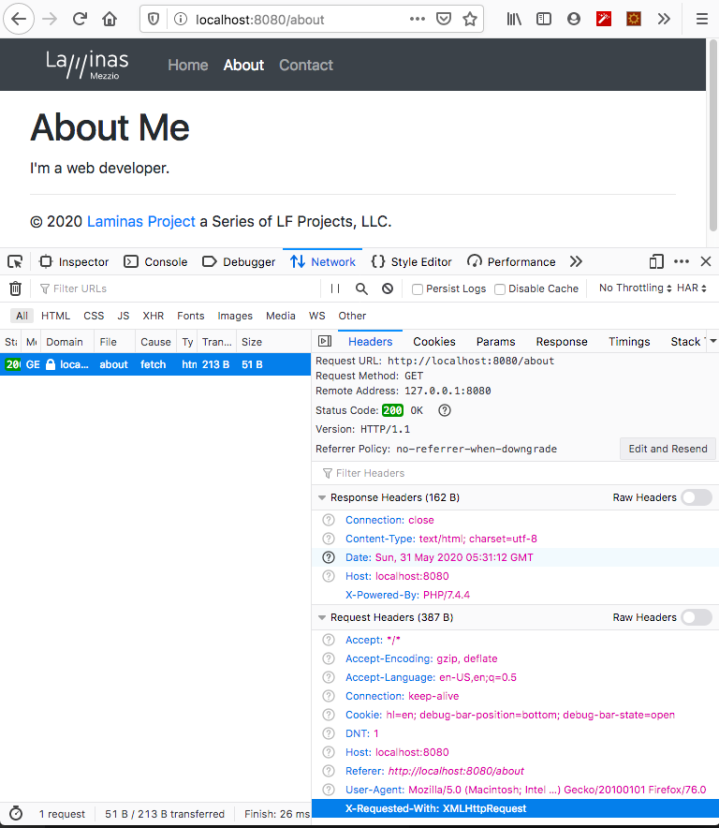
Using Vue.js in Mezzio Application
So, another JavaScript post! If you read my post at 2015 about Ember.js usage in Zend Framework 2 application, now let’s try with Vue.js, but for Mezzio application.
Let’s start with download the mezzio skeleton:
composer create-project mezzio/mezzio-skeleton mezzio-vue
I assume next you choose the following options:
- Type of Installation: Modular (3)
- Container: Laminas ServiceManager (3)
- Router: Laminas Router (3)
- Template Engine: Laminas View (3)
Now, we are on the same page!
The scenario is same, we want to create an SPA application. In Mezzio part, to make it work, it require template handling for ajax request.
We can create middleware for that:
<?php

declare(strict_types=1);

namespace App\Middleware;

use Mezzio\Template\TemplateRendererInterface;
use Psr\Http\Message\ResponseInterface;
use Psr\Http\Message\ServerRequestInterface;
use Psr\Http\Server\MiddlewareInterface;
use Psr\Http\Server\RequestHandlerInterface;

class XMLHttpRequestTemplateMiddleware implements MiddlewareInterface
{
    private $template;

    public function __construct(TemplateRendererInterface $template)
    {
        $this->template = $template;
    }

    public function process(ServerRequestInterface $request, RequestHandlerInterface $handler) : ResponseInterface
    {
        if (in_array('XMLHttpRequest', $request->getHeader('X-Requested-With'), true)) {
            (function ($template) {
                $template->layout = false;
            })->bindTo($this->template, $this->template)($this->template);
        }

        return $handler->handle($request);
    }
}
In above middleware, we set template layout to false to disable layout when request has X-Requested-With = XmlHttpRequest as an ajax detection. Let’s register above middleware in ConfigProvider class:
<?php
 // src/App/src/ConfigProvider.php
declare(strict_types=1);

namespace App;

use Laminas\ServiceManager\AbstractFactory\ReflectionBasedAbstractFactory;

class ConfigProvider
{
    // ...
    public function getDependencies() : array
    {
        return [
            'invokables' => [
                 // ...
            ],
            'factories'  => [
                // ..
                Middleware\XMLHttpRequestTemplateMiddleware::class => ReflectionBasedAbstractFactory::class,
            ],
        ];
    }
    // ...
}
and in the pipeline before DispatchMiddleware:
<?php
 // config/pipeline.php
use App\Middleware\XMLHttpRequestTemplateMiddleware;
return function (Application $app, MiddlewareFactory $factory, ContainerInterface $container) : void {
    // ...
    $app->pipe(XMLHttpRequestTemplateMiddleware::class);
    $app->pipe(DispatchMiddleware::class);
    // ...
};
We need to handle 404 Pages that can work in Ajax request, so we can create a new middleware for that, for example: App\Middleware\NotFoundMiddleware:
<?php

declare(strict_types=1);

namespace App\Middleware;

use Laminas\Diactoros\Response\HtmlResponse;
use Mezzio\Template\TemplateRendererInterface;
use Psr\Http\Message\ResponseInterface;
use Psr\Http\Message\ServerRequestInterface;
use Psr\Http\Server\MiddlewareInterface;
use Psr\Http\Server\RequestHandlerInterface;

class NotFoundMiddleware implements MiddlewareInterface
{
    private $template;
    private $config;

    public function __construct(TemplateRendererInterface $template, array $config)
    {
        $this->template = $template;
        $this->config   = $config;
    }

    public function process(ServerRequestInterface $request, RequestHandlerInterface $handler) : ResponseInterface
    {
        return new HtmlResponse(
            $this->template->render($this->config['mezzio']['error_handler']['template_404'])
        );
    }
}
The above middleware need to be registered to ConfigProvider:
<?php
 // src/App/src/ConfigProvider.php
declare(strict_types=1);

namespace App;

use Laminas\ServiceManager\AbstractFactory\ReflectionBasedAbstractFactory;

class ConfigProvider
{
    // ...
    public function getDependencies() : array
    {
        return [
            'invokables' => [
                 // ...
            ],
            'factories'  => [
                // ..
                Middleware\NotFoundMiddleware::class  => ReflectionBasedAbstractFactory::class,
            ],
        ];
    }
    // ...
}
And then, add to config/pipeline after DispatchMiddleware:
<?php
 // config/pipeline.php

use App\Middleware\NotFoundMiddleware;
use App\Middleware\XMLHttpRequestTemplateMiddleware;

return function (Application $app, MiddlewareFactory $factory, ContainerInterface $container) : void {
    // ...
    $app->pipe(XMLHttpRequestTemplateMiddleware::class);
    $app->pipe(DispatchMiddleware::class);
    $app->pipe(NotFoundMiddleware::class);
    // ...
};
Now, let’s add About and Contact page handlers:
1. About Page
<?php
// src/App/src/Handler/AboutPageHandler.php
declare(strict_types=1);

namespace App\Handler;

use Laminas\Diactoros\Response\HtmlResponse;
use Mezzio\Template\TemplateRendererInterface;
use Psr\Http\Message\ResponseInterface;
use Psr\Http\Message\ServerRequestInterface;
use Psr\Http\Server\RequestHandlerInterface;

class AboutPageHandler implements RequestHandlerInterface
{
    private $template;

    public function __construct(TemplateRendererInterface $template)
    {
        $this->template = $template;
    }

    public function handle(ServerRequestInterface $request) : ResponseInterface
    {
        return new HtmlResponse($this->template->render('app::about-page'));
    }
}
With templates:
<!-- src/templates/app/about-page.phtml -->
<h1>About Me</h1>
<p>
    I'm a web developer.
</p>
2. Contact Page
<?php
// src/App/src/Handler/ContactPageHandler.php
declare(strict_types=1);

namespace App\Handler;

use Laminas\Diactoros\Response\HtmlResponse;
use Mezzio\Template\TemplateRendererInterface;
use Psr\Http\Message\ResponseInterface;
use Psr\Http\Message\ServerRequestInterface;
use Psr\Http\Server\RequestHandlerInterface;

class ContactPageHandler implements RequestHandlerInterface
{
    private $template;

    public function __construct(TemplateRendererInterface $template)
    {
        $this->template = $template;
    }

    public function handle(ServerRequestInterface $request) : ResponseInterface
    {
        return new HtmlResponse($this->template->render('app::contact-page'));
    }
}
With templates:
<!-- src/templates/app/contact-page.phtml -->
<h1>Contact Me</h1>
<p>
    You can contact me via <a href="mailto: foo@bar.baz.com">foo@bar.baz.com</a>
</p>
Handlers Registration
Both AbooutPageHandler and ContactPageHandler need to be registered in ConfigProvider class:
<?php
 // src/App/src/ConfigProvider.php
declare(strict_types=1);

namespace App;

use Laminas\ServiceManager\AbstractFactory\ReflectionBasedAbstractFactory;

class ConfigProvider
{
    // ...
    public function getDependencies() : array
    {
        return [
            'invokables' => [
                 // ...
            ],
            'factories'  => [
                // ..
                Handler\AboutPageHandler::class => ReflectionBasedAbstractFactory::class,
                Handler\ContactPageHandler::class => ReflectionBasedAbstractFactory::class,
                // ...
            ],
        ];
    }
    // ...
}
and in the routes:
<?php
// config/routes.php
return static function (Application $app, MiddlewareFactory $factory, ContainerInterface $container) : void {
    // ...
    $app->get('/about', App\Handler\AboutPageHandler::class, 'about');
    $app->get('/contact', App\Handler\ContactPageHandler::class, 'contact');
};
Now, we have 3 html pages: Home, About, and Contact. It’s enough for demonstration.
JS dependencies
We can register js dependencies in the layout by add the following js:
<?php
// src/App/templates/layout/default.phtml

$this->headLink()
    ->prependStylesheet('https://use.fontawesome.com/releases/v5.12.1/css/all.css')
    ->prependStylesheet('https://maxcdn.bootstrapcdn.com/bootstrap/4.4.1/css/bootstrap.min.css');
$this->inlineScript()

    ->prependFile('/js/app.js')
    ->prependFile('https://unpkg.com/vue-router@3.3.2/dist/vue-router.js')
    ->prependFile('https://unpkg.com/vue@2.6.11/dist/vue.js')

    ->prependFile('https://maxcdn.bootstrapcdn.com/bootstrap/4.4.1/js/bootstrap.min.js')
    ->prependFile('https://code.jquery.com/jquery-3.5.0.min.js');
?>
Vue dependencies are Vue.js core and Vue Router for routing. For /js/app.js, that’s our code to make routing definition. In the layout, we need element for mounting, let’s define is as “root” under body:
<!-- // src/App/templates/layout/default.phtml -->
<body class="app">
    <div id="root">

    </div>
    <?=$this->inlineScript()?>
</body>
Now, we can define the router links inside “root” div:
<!-- // src/App/templates/layout/default.phtml -->
<div id="root">

        <header class="app-header">
            <nav class="navbar navbar-expand-sm navbar-dark bg-dark fixed-top" role="navigation">
                <div class="container">
                    <div class="navbar-header">
                        <button type="button" class="navbar-toggler" data-toggle="collapse" data-target="#navbarCollapse" aria-controls="#navbarCollapse" aria-expanded="false" aria-label="Toggle navigation">
                            <span class="navbar-toggler-icon"></span>
                        </button>
                        <router-link to="/" class="navbar-brand"><img src="https://docs.laminas.dev/img/laminas-mezzio-rgb.svg" alt="Laminas Mezzio" height="56" /></router-link>
                    </div>
                    <div class="collapse navbar-collapse" id="navbarCollapse">
                        <ul class="navbar-nav mr-auto">
                            <li class="nav-item">
                                <router-link to="/" class="nav-link">Home</router-link>
                            </li>
                            <li class="nav-item">
                                <router-link to="/about" class="nav-link">About</router-link>
                            </li>
                            <li class="nav-item">
                                <router-link to="/contact" class="nav-link">Contact</router-link>
                            </li>
                        </ul>
                    </div>
                </div>
            </nav>
        </header>

</div>
Next, time for the view content placeholder, we can define router-view inside “root” div as well for place to collect the content:
<!-- // src/App/templates/layout/default.phtml -->
<div id="root">
        <header class="app-header"> <!-- content app header before --> </header>

        <main class="container">
            <div id="app">
                <keep-alive> <!-- make content cached if already loaded -->
                    <router-view></router-view>
                </keep-alive>
            </div>
        </main>

        <!-- footer here -->
</div>
Now, our JS file in public/js/app.js for routing definition:
createPage = (name) => {
    return Vue.component('page-' + name, {
        data: () => {
            return  {
              content: 'Loading...'
            }
        },
        mounted () {
            (new Promise( (resolve) => {
                fetch(
                    this.$route.path,
                    {
                        method: 'GET',
                        headers: {
                            'X-Requested-With': 'XMLHttpRequest',
                        }
                    }
                ).then(response =>  resolve(response.text()));
            })).then(result => this.content = result);
        },
        template: '<div v-html="content"></div>'
    });
}

const routes = [
    { path: '/', component: createPage('home') },
    { path: '/about', component: createPage('about') },
    { path: '/contact', component: createPage('contact') },
    { path: '*', component: createPage('404') }
];

const router = new VueRouter({
    routes,
    base: '/',
    mode: 'history',
    linkExactActiveClass: "active"
});
const app    = new Vue({router}).$mount('#root')
In above code, we create a page component on the fly via function createPage and apply to each path. Setup VueRouter with routes definition, and make a Vue instance with it, mount to div id #root.
Bonus
How about make page title changed after on change page? We can set meta title in each route definition, and use router.afterEach() to apply it:
// ...
const routes = [
	{ path: '/', component: createPage('home'),  meta: {
            title: 'Home'
        } },
	{ path: '/about', component: createPage('about'), meta: {
            title: 'About Me'
        } },
	{ path: '/contact', component: createPage('contact'), meta: {
            title: 'Contact Me'
        } },
    { path: '*', component: createPage('404'), meta: {
            title: '404 Not Found'
        } }
];

const router = new VueRouter({
    routes,
    base: '/',
    mode: 'history',
    linkExactActiveClass: "active"
});

router.afterEach(to => document.title = to.meta.title);
// ...
Now, if we check, we will get SPA working:
That’s it! I uploaded the sample source code at github: https://github.com/samsonasik/mezzio-vue
References:
– https://vuejs.org/v2/guide/
– https://router.vuejs.org/guide/#html
– https://medium.com/badr-interactive/mengenal-lifecycle-hooks-pada-vue-js-78cd2225a69
– https://forum.vuejs.org/t/setting-a-correct-base-url-with-vue-router/24726/2
– https://forum.vuejs.org/t/how-do-i-make-an-html-tag-inside-a-data-string-render-as-an-html-tag/13074/3
Handle Promise.allSettled() resolved and each rejected Promise
This is a Javascript post! As you probably already knew, that Promise.all() is all or never. How about run all the things even there is/are a rejected promise(s)? There is Promise.allSettled() for that.
The issue is about catching the error for specific promise(s). You CANNOT do this:
await Promise.allSettled(
        [
            promise2,
            promise1,
            promise3
        ]
    )
    .then((results) => results.forEach((result) => {
        // ...
    }))
    .catch(
        // ...
    )
    .finally(
        // ...
    );
As above will only works for Promise.all(), while the resolved promises won’t executed even only there is one promise that rejected.
What you need to do is loop the results, and you will get the result like the following:

On loop, you can check if it has status == ‘rejected’, that a way you know that the promise rejected. The result will always has ‘reason’ key when it rejected, even if the reject value is undefined. So, the code can be:
await Promise.allSettled(
        [
            promise2,
            promise1,
            promise3
        ]
    )
    .then(
        (results) => {
            for (let result of results) {
                if (result.status == 'rejected') {
                    // handle rejected promise here
                    // eg: make console.log()...
                    console.log('error : ' + result.reason);

                    // continue to next iteration
                    continue;
                }

                // handle fulfilled promise here
                // eg: append in the div
                document.getElementsByClassName('load')[0].innerHTML += result.value + '<br />';
            }
        }
    )
    .finally(
        // ...
    );
That’s it!
References:

1 comment